1 Introduction
1.1 Goal of OpenXR
OpenXR aims to help solve the fragmentation of the XR ecosystem. Before the advent of OpenXR, software developers working with multiple hardware platforms had to write different code paths for each platform to address the different hardware. Each platform had its own, often proprietary, API, and deploying an existing application to a new platform required a lot of adaptation. Developing a new application for a new platform was even more challenging. Documentation for the OpenXR 1.0 Core Specification can be found https://registry.khronos.org/OpenXR/specs/1.1/html/xrspec.html.
Despite of their unique features, the platforms had a great deal in common. For example, most headsets had a main view seen from two slightly different perspectives. Most had a way to track the user’s head and hands or hand controllers. Most had buttons, many had analogue controls like triggers or joysticks and many had haptic feedback.
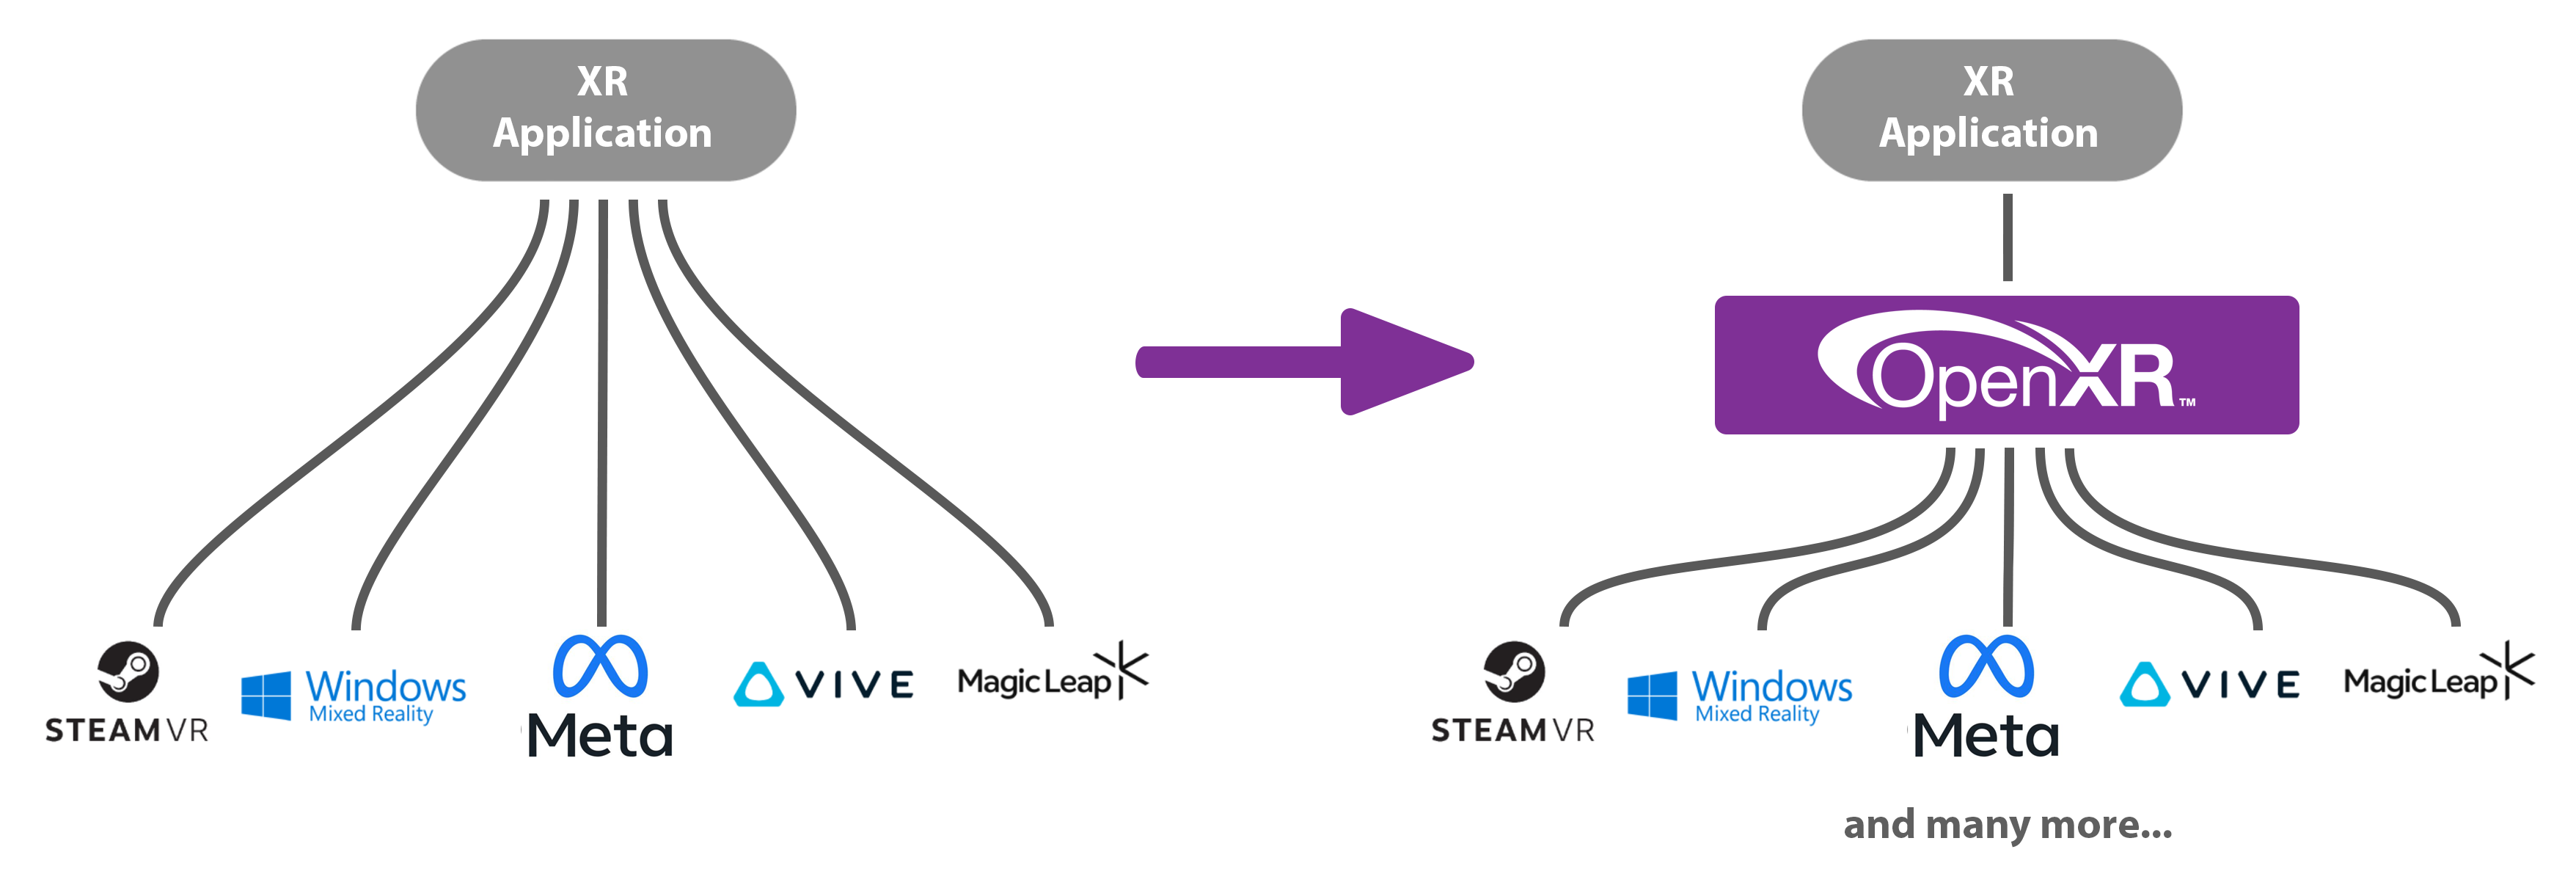
OpenXR provides a common interface to reduce XR fragmentation.
OpenXR aims to solve this problem by providing a common API to address XR hardware, in reading its inputs and outputting to its displays and haptic systems. Just as OpenGL and Vulkan provide a common API to access graphics hardware, so OpenXR allows you to write code that works with multiple XR platforms, with minimal adaptation.
1.2 Overview
We’ll start with the main concepts you’ll need to be familiar with around OpenXR.
Concept |
Description |
|---|---|
API |
The OpenXR API is the set of commands, functions and structures that an OpenXR-compliant runtime is required to offer. |
Application |
The Application is your program, called an “app” for short. |
Runtime |
A Runtime is a specific implementation of the OpenXR functionality. It might be provided by a hardware vendor, as part of a device’s operating system; it might be supplied by a software vendor to enable OpenXR support with a specific range of hardware. The Loader finds the appropriate Runtime and loads it when OpenXR is initialized. |
Loader |
The OpenXR Loader is a special library that connects your application to whichever OpenXR Runtime you’re using. The Loader’s job is to find the Runtime and initialize it, then allow your application to access the Runtime’s version of the API. Some devices can have multiple Runtimes available, but only one can be active at any given time. |
Layers |
API layers are optional components that augment an OpenXR system. A Layer might help with debugging, or filter information between the application and the Runtime. API layers are selectively enabled when the OpenXR Instance is created. |
Instance |
The Instance is the foundational object that allows your application to communicate with a Runtime. You’ll ask OpenXR to create an Instance when initializing XR support in your application. |
Graphics |
OpenXR needs to connect to a graphics API in order to render the headset views. Which Graphics APIs are supported depends on the Runtime and the hardware. |
Input/Output |
OpenXR allows apps to query what inputs and outputs are available. These can then be bound to Actions, so the app knows what the user is doing. |
Action |
A semantically-defined input or output for the app, which can be bound to different hardware inputs or outputs using Bindings. |
Binding |
A mapping from hardware/Runtime-defined inputs and outputs to semantic Actions. |
Pose |
A position and orientation in 3D space. |
OpenXR provides a clear and precise common language for developers and hardware vendors to use.
An OpenXR Runtime implements the OpenXR API. The runtime translates the OpenXR function calls into something that the vendor’s software/hardware can understand.
The OpenXR Loader finds and loads a suitable OpenXR runtime that is present on the system. The Loader will load in all of the OpenXR function pointers stated in the core specification for the application to use. If you are using an extension, such as XR_EXT_debug_utils, any functions associated with that extension will need to be loaded in with xrGetInstanceProcAddr. Some platforms like Android require extra work and information to initialize the loader. Documentation for the OpenXR Loader can be found https://registry.khronos.org/OpenXR/specs/1.1/loader.html.
API Layers are additional code layers that are inserted by the loader between the application and the runtime. Each of these API layers intercepts the OpenXR function calls from the layer above, does something with that function, and then calls the next layer down. Examples of API Layers would be: logging the OpenXR functions to the output or a file; creating trace files of the OpenXR calls for later replay; or for checking that the function calls made to OpenXR are compatible with the OpenXR specification. See Chapter 6.3.
OpenXR supports multiple graphics APIs via its extension functionality. OpenXR can extend its functionality to include debugging layers, vendor hardware and software support and graphics APIs. This idea of absolving the core specification of the graphics API functionality provides flexibility in choosing the graphics APIs now and in the future. OpenXR is targeted at developing XR experiences and isn’t concerned with the specifics of any graphics APIs. The extensible nature of OpenXR allows revisions of existing APIs and new graphics APIs to be integrated with ease. See Chapter 5.
OpenXR recognizes that there is a vast and ever-changing array of hardware and configurations in the XR space. With new headsets and controllers coming to the market, an abstraction of the input system was needed so that the same applications can target different and newer hardware with minimal change. This is the core reasoning behind the OpenXR Actions System.
1.3 Environment Setup
This section will help you set up your development environment. Here your choice of platform makes a difference, but afterwards, things will be much more consistent. You can change platform and graphics API at any time by clicking the tabs at the top of the page. Select the platform you want to develop for now, by clicking the appropriate tab above.
You should make sure that the XR runtime that you wish to use is made the default for the XR loader to recognize and load for your application.
Visual Studio
If you’ll be building an OpenXR project for Microsoft Windows PC-based devices, we’ll assume you’ll be using Microsoft Visual Studio. The free Community Edition of Visual Studio is available to download from https://visualstudio.microsoft.com/vs/community/.
CMake
Install the latest CMake. This tutorial uses CMake to generate the Visual Studio Solution and Project files. At least CMake 3.28.3 will be needed, so follow the instructions on the CMake download page to ensure that you have an up-to-date version.
Next, you’ll want to choose which graphics API you’ll be using.
If you’re using Vulkan, download and install the latest Vulkan SDK.
You will need GPU that supports at least Vulkan 1.0 for this tutorial.
1.4 Project Setup
This section explains how to set up your project ready for Chapter 2 and will make references to the /Chapter2 folder. It explains how to include the OpenXR headers, link the openxr_loader library, graphics API integration, and other boilerplate code and finally create a simple stub application which will be expanded on in later chapters.
1.4.1 CMake and Project Files
For the Microsoft Windows OpenXR project, we’ll use CMake to create the solution and project files for Visual Studio. Create a directory where the code will go, we’ll call this the workspace directory.
Create a folder called cmake in the workspace directory. Download the linked file below and put it in cmake. This will be used in our CMakeLists.txt to help build our project.
Now, create a text file in the workspace folder called CMakeLists.txt and in it, put the following code:
cmake_minimum_required(VERSION 3.28.3)

project(openxr-tutorial)

set(CMAKE_CONFIGURATION_TYPES "Debug;Release")

# Optional override runtime
set(XR_RUNTIME_JSON
    "$ENV{XR_RUNTIME_JSON}"
    CACHE PATH
          "Optional location of a specific OpenXR runtime configuration file."
)
Here, we specify the CMake version, project name and configuration types, and provide a CMake variable called XR_RUNTIME_JSON which you can use to point to the runtime you will be using (by default, OpenXR will try to find the standard runtime from your hardware vendor). Finally, we specify CMake to continue the build into the Chapter2 directory with add_subdirectory().
add_subdirectory(Chapter2)
In the workspace folder, create a folder called Chapter2, and in it create another CMakeLists.txt file. Into the Chapter2/CMakeLists.txt, put the following code:
cmake_minimum_required(VERSION 3.28.3)
set(PROJECT_NAME OpenXRTutorialChapter2)
project("${PROJECT_NAME}")
This sets a minimum CMake version (required for some of the features we use here) and our own CMake variable PROJECT_NAME which is set to OpenXRTutorialChapter2. Now add:
# Additional Directories for find_package() to search within.
list(APPEND CMAKE_MODULE_PATH "${CMAKE_CURRENT_SOURCE_DIR}/../cmake")
Now, we append to the CMAKE_MODULE_PATH variable an additional path for find_package() to search within.
# For FetchContent_Declare() and FetchContent_MakeAvailable()
include(FetchContent)

# openxr_loader - From github.com/KhronosGroup
set(BUILD_API_LAYERS
        ON
        CACHE INTERNAL "Use OpenXR layers"
)
set(BUILD_TESTS
        OFF
        CACHE INTERNAL "Build tests"
)
FetchContent_Declare(
    OpenXR
    EXCLUDE_FROM_ALL
    DOWNLOAD_EXTRACT_TIMESTAMP
    URL_HASH MD5=f52248ef83da9134bec2b2d8e0970677
    URL https://github.com/KhronosGroup/OpenXR-SDK-Source/archive/refs/tags/release-1.1.49.tar.gz
    SOURCE_DIR
    openxr
)

FetchContent_MakeAvailable(OpenXR)
We include FetchContent and use it to get the OpenXR-SDK-Source from Khronos’s GitHub page.
Now, we will add to Chapter2/CMakeLists.txt the source and header files by adding the following code. Here, we are including all the files needed for our project.
# Files
set(SOURCES
        "main.cpp"
        "../Common/GraphicsAPI.cpp"
        "../Common/GraphicsAPI_Vulkan.cpp"
        "../Common/OpenXRDebugUtils.cpp")
set(HEADERS
        "../Common/DebugOutput.h"
        "../Common/GraphicsAPI.h"
        "../Common/GraphicsAPI_Vulkan.h"
        "../Common/HelperFunctions.h"
        "../Common/OpenXRDebugUtils.h"
        "../Common/OpenXRHelper.h")
All the files listed above with ../Common/*.* are available to download below. In the next section, you will find the links and a discussion of their usage. This tutorial includes all the graphics APIs header and cpp files; you only need to download the files for your chosen graphics API.
Add the following code to Chapter2/CMakeLists.txt:
add_executable(${PROJECT_NAME} ${SOURCES} ${HEADERS})
add_dependencies(${PROJECT_NAME} XrApiLayer_core_validation)

if(NOT "${XR_RUNTIME_JSON}" STREQUAL "")
    set_target_properties(
        ${PROJECT_NAME} PROPERTIES VS_DEBUGGER_ENVIRONMENT
                                   "XR_RUNTIME_JSON=${XR_RUNTIME_JSON}"
    )
endif()

target_include_directories(
    ${PROJECT_NAME}
    PRIVATE
        # In this repo
        ../Common/
        # From OpenXR repo
        "${openxr_SOURCE_DIR}/src/common"
        "${openxr_SOURCE_DIR}/external/include"
)
target_link_libraries(${PROJECT_NAME} openxr_loader)
We have used add_executable() to create the program we’ll be building, and specified its ${SOURCES} and ${HEADERS}. We passed the XR_RUNTIME_JSON variable on to the debugging environment (Windows only). We’ve added the ../Common, "${openxr_SOURCE_DIR}/src/common" and "${openxr_SOURCE_DIR}/external/include" folders as include directories and linked the openxr_loader which we obtained with FetchContent. This will also add the include directory for the OpenXR headers.
# VulkanSDK
find_package(Vulkan)
if(Vulkan_FOUND)
    target_include_directories(
        ${PROJECT_NAME} PUBLIC ${Vulkan_INCLUDE_DIRS}
    )
    target_link_libraries(${PROJECT_NAME} ${Vulkan_LIBRARIES})
    target_compile_definitions(
        ${PROJECT_NAME} PUBLIC XR_TUTORIAL_USE_VULKAN
    )
endif()
If you have the Vulkan SDK installed, this CMake code will try to find that package, add the include directories and link the Vulkan libraries. We’ve added the XR_TUTORIAL_USE_VULKAN compiler definition to specify which graphics APIs should be supported and have their headers included in GraphicsAPI.h.
That’s all the CMake code that we require for this project.
1.4.2 Common Files
Create a folder called Common in the workspace directory. Download each of the linked files below and put them in Common:
Or, you can download the zip archive containing all the required files. Extract the archive to get the Common folder.
DebugOutput
DebugOutput is a class that redirects std::cout and std::cerr to the output window in your IDE.
DebugOutput uses OutputDebugStringA() to log the message to the Visual Studio Output window.
HelperFunctions
This is a simple header file for boilerplate code for the various platforms. It includes various C/C++ standard header and the code that defines the macro DEBUG_BREAK, according to which platform we’re building for. This macro will stop the execution of your program when an error occurs, so you can see where it happened and fix it. We use this macro in the OpenXRMessageCallbackFunction() function, which is discussed in detail in Chapter 2.1.
IsStringInVector() and BitwiseCheck() are just simple wrappers over commonly used code. IsStringInVector() checks if a const char * is in a std::vector<const char *> by using strcmp(), and BitwiseCheck() checks if a bit is set in a bitfield.
OpenXRDebugUtils
A header and cpp file pair that helps in setting up the DebugUtilsMessenger. XR_EXT_debug_utils is an OpenXR instance extension that can intercept calls made to OpenXR and provide extra information or report warnings and errors, if the usage of the API or the current state of OpenXR is not valid. As you go through this tutorial it is highly recommended to have this enabled to help with debugging. This is discussed in detail in Chapter 2.1, but in general, CreateOpenXRDebugUtilsMessenger() creates and DestroyOpenXRDebugUtilsMessenger() destroys an XrDebugUtilsMessengerEXT. OpenXRMessageCallbackFunction() is a callback function that is specified at object creation, which is called when OpenXR raises an issue. The header declares the functions and the cpp defines them.
OpenXRHelper
A header for including all the needed header files and helper functions. Looking inside this file, we can see:
// Define any XR_USE_PLATFORM_... / XR_USE_GRAPHICS_API_... before this header file.

// OpenXR Headers
#include <openxr/openxr.h>
#include <openxr/openxr_platform.h>
Here, we include the main OpenXR header file openxr.h and the OpenXR platform header file openxr_platform.h. For the OpenXR platform header file, note the comment about using the preceding XR_USE_PLATFORM_... and XR_USE_GRAPHICS_API_... macros. When enabled, we gain access to functionality that interacts with the chosen graphics API and/or platform. These macros are automatically set by GraphicsAPI.h
This header also defines the macro OPENXR_CHECK. Many OpenXR functions return an XrResult. This macro will check if the call has failed and will log a message to std::cerr. This can be modified to suit your needs. There are two additional functions GetXRErrorString() and OpenXRDebugBreak(), which are used to convert the XrResult to a string and as a breakpoint function respectively.
1.4.3 Main.cpp and the OpenXRTutorial Class
Now, create a text file called main.cpp in the Chapter2 folder. Open main.cpp and add the following:
#include <DebugOutput.h>
Next, we add the GraphicsAPI_....h header to include the GraphicsAPI code of your chosen graphics API. This will in turn include GraphicsAPI.h, HelperFunctions.h and OpenXRHelper.h.
#include <GraphicsAPI_Vulkan.h>
You can also include OpenXRDebugUtils.h to help with the set-up of XrDebugUtilsMessengerEXT.
#include <OpenXRDebugUtils.h>
Now we will define the main class OpenXRTutorial of the application. It’s just a stub class for now, with an empty Run() method. Add the following to main.cpp:
class OpenXRTutorial {
public:
        OpenXRTutorial(GraphicsAPI_Type apiType)
        {
        }
        ~OpenXRTutorial() = default;
        void Run()
        {
        }
private:
        void PollSystemEvents()
        {
        }
private:
        bool m_applicationRunning = true;
        bool m_sessionRunning = false;
};
Note here that for some platforms, we need additional functionality provided via the PollSystemEvents() method, so that our application can react to any relevant updates from the platform correctly.
For Windows and Linux, there are no relevant system events that we need to be aware of, and thus the PollSystemEvents() method definition can be left blank.
We’ll add the main function for the application. It will look slightly different, depending on your
chosen platform. We first create a ‘pseudo-main function’ called OpenXRTutorial_Main(), in which we create an instance of our OpenXRTutorial class, taking a GraphicsAPI_Type parameter, and call the Run() method. GraphicsAPI_Type can be changed to suit the graphics API that you have chosen.
void OpenXRTutorial_Main(GraphicsAPI_Type apiType) {
    DebugOutput debugOutput;  // This redirects std::cerr and std::cout to the IDE's output or Android Studio's logcat.
    XR_TUT_LOG("OpenXR Tutorial Chapter 2");
    OpenXRTutorial app(apiType);
    app.Run();
}
Then, we create the actual platform-specific main function (our entry point to the application), which will call OpenXRTutorial_Main() with our GraphicsAPI_Type parameter. This must be changed to match on your chosen graphics API, one of: D3D11, D3D12, OPENGL, OPENGL_ES, or VULKAN.
int main(int argc, char **argv) {
    OpenXRTutorial_Main(VULKAN);
}
1.4.4 Build and Run
In the workspace directory, create a build/ folder, which will contain our project, solution and output binary files. Now launch the CMake GUI, and point the “Where is the source code” box to the workspace directory, where your original CMakeLists.txt is located. Point the “Where to build the binaries” box to a subdirectory called build, that we have just created. Click “Configure” and “OK” to accept the default Generator, then click “Generate” to create the Visual Studio solution and project. Finally, click “Open Project” to open that solution with Visual Studio.
If you wish to build the project with CMake at the terminal, use the following commands to configure and generate the project:
mkdir build
cd build
cmake -G "<your_visual_studio_version>" ../
You can now build and run your program. It should compile and link with no errors or warnings, but it won’t run correctly yet.
If you wish to run the application outside of you IDE, you will need to be aware of the working directory for the application to run correctly. For example, To run the debug varinat of the Chapter2 application, use this:
[...]/<workspaceFolder>/build/Chapter2>"Debug/OpenXRTutorialChapter2"
1.5 Summary
In this chapter, you learned about the fundamental concepts of OpenXR and created a project you will use to build your OpenXR application. Now that we have this basic application up and running, we will start to set up OpenXR.
Below is a download link to a zip archive for this chapter containing all the C++ and CMake code for all platform and graphics APIs. Note that Chapter2 is renamed to Chapter1 is the archive and repository folder.
Version: v1.0.13